Convert media-rich documents to an iPad- and iPhone-friendly format.
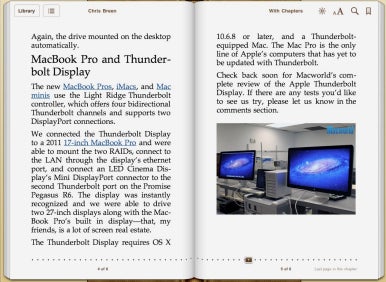
When you convert a file to the ePub format you don't lose its links, images, or movies.
Use Automator to convert filesLion offers a built-in means for doing this via Automator’s Text To EPUB action. You can access it either by building a single-action Automator workflow or by installing a few services and engaging those services using a contextual menu. We’ll start with the Automator method.
Launch Automator (in /Applications), choose Application in the sheet that appears, and click Choose. In the Automator window, select Text in the Library pane and then drag the Text To EPUB File item in the Actions pane to the workflow area. Click the Options button and enable the Show This Action When the Workflow Runs option. Choose File -> Save and then name the workflow (for example, Convert to EPUB). Save it to the Desktop as an application.
Now create your text document and save it as an RTF (Rich Text Format) file. (Any text editor or word processing application that supports RTF—including Microsoft Word and Apple's TextEdit—will do.) When you're done, save the document and then drag the document's file icon onto the workflow application you created. A Text To EPUB File window will appear.
It's within this window that the magic happens. Simply add the information the application asks for. Begin by entering the title for your document—this is the name that will appear within iBooks. Your author name will be filled in automatically with your administrator's long name (you can change it if you want to). Enter a name for your file in the Save As field (this can be a different name than the title), followed by the .epub extension—so, My Book.epub, for example. Choose a location to save your file from the Where pop-up menu.
If you’d like to add a cover image to your “book” just drag an image file to the Cover Image pop-up menu (or choose Other from that pop-up menu and navigate to the image you’d like to use). You can add an image, audio, or movie file to the beginning or end of your book. To do so, click the Add button, navigate to the file you want to use, and click Add in the sheet. From the Place Media pop-up menu, choose whether to add that media to the beginning or end of the book. (If you add more than one media file to a chapter the first file will appear where you directed it—at the beginning or end—and subsequent files will appear at the end of the book.)
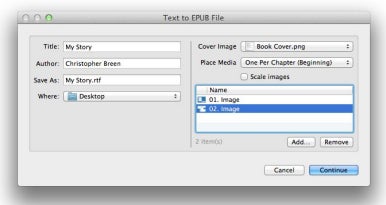
Set up the particulars for your document (soon to be an ebook) in this window.
Click Continue and the application will create an ePub file, ready to sync to your iOS device. After you’ve synced the file just launch iBooks, locate your newly added book in the list of books, and tap it. Your cover art will appear as the cover within iBooks; any art, audio, or movies you’ve added to the book will appear as well; and any web links will be live. Tap one and Safari will open on the device and take you to the linked page.
You’re not limited to a single chapter, however. One way to add multiple chapters is to select them all and drag them to the application you created. They’ll appear in alphabetical order, so you should provide them with names that are easily sorted—Chapter 01: The Beginning, Chapter 02: The Middle,Chapter 03: The End, for example. If, in our three-chapter example book, you also add media files and choose to place them at the beginning of the chapter, each chapter will begin with its own image, audio snippet, or movie.
Download an easy-access service to convert files
Alternatively, you needn’t create this workflow at all. You can create an ePub book using one of the services described at Mac OS X Automation.com. (The site also includes a fully constructed example file that you can download to your iPad using this link.) The four installable services (download here) include Create EPUB Book With Contents Of Clipboard, Create EPUB Book With Selected Files, Create EPUB Book With Selected Text, and Create Formatted EPUB Book With Selected Text. Double-click each one to install it in the correct location.
Turn several documents into an ePub file using a downloadable OS X service.
The first service you’ll invoke using the Services menu within an application. So, for example, while working in Pages, select some text, copy it, choose Pages -> Services, and then select this service from the list. The Text To EPUB File window appears. Here you can add elements to your book.
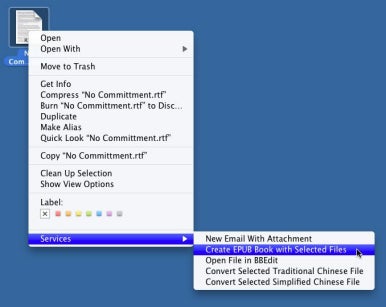
Create EPUB Book With Selected Files allows you to add multiple files (each representing a single chapter). To use it, select multiple text or .rtf files in the Finder, Control-click (right-click) on them, and select Services -> Create EPUB Book With Selected Files from the contextual menu. Again, the Text To EPUB File window appears. Configure it as outlined above.
Create EPUB Book With Selected Text works within a document. Select some text, Control-click (right-click) on that text, and choose this command to open the Text To EPUB File window. Note that the resulting ePub file will not contain live links or the original file's formatting.
Create Formatted EPUB Book with Selected Text works the same way—select some text, invoke the command, and up pops the Text to EPUB File window. The difference between this service and the one previously mentioned is that the ePub book you create will use the original file’s formatting and live links.
Regardless of which method you choose, it's easy to turn your media- and link-rich documents into iBooks-friendly files.
Comments
Post a Comment